Monday, March 14, 2011

How deep do your roots grow?

Seeds planted 1/8in
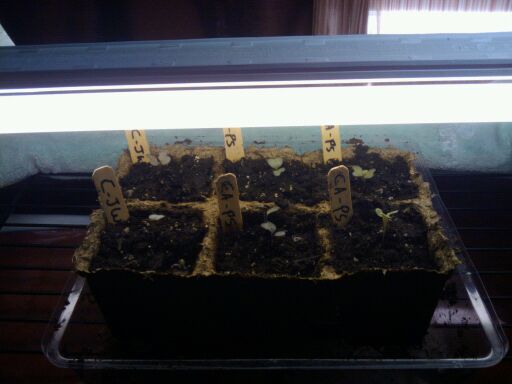
I wish there was a timeline with pictures somewhere out in the virtual world where I could compare my growth with the "normal" development.  I planted the brassicas on Feb 23rd in a Burpee 25 cell netted pellet eco greenhouse (plastic is plant based and the netted pellets are coconut coir).  They almost fully sprouted by the 26th and were under lights since then.

Seedlings emerging
After about a week all the seedlings looked great with cotyledons and about an inch worth of vertical growth.  I had them <2 inches under lights 16 hrs a day.  I kept them on the dry side and watered them from below.  I also misted them with chamomile tea/water to help avoid damping off.
1 week old


Things seem to be going well.  I even see some buds to suggest that the true leaves are about to show themselves.  I had read that one shouldn't pot up into soil until the true leaves are out since the seedling feeds off of the cotyledon.  So I wait and wait and wait.  And about 2 weeks out the cotyledons look a little dusky.  I'm not patient so I lift up one of the pellets and I see that the roots are emerging from the sides and dangling long out the bottom.

2 weeks old 

See all the roots hanging down?
This seems to suggest to me that the roots are going deep looking for food.  The coconut coir has no sustenance per se so do I pot up now or do I use a water based fertilizer.  I sent out cries of help to SFG foundation forums and Dave's Garden forums.  It seems as others have had problems with the roots coming out of the bottoms.  I also was warned that I might "burn" the roots by feeding directly.

After much hemming and hawing I decided to pot up on March 11.  I used cowpots (biodegradable and made from cow manure) and an organic potting mix.  Clearly the pellet netting did not stop the roots from penetrating the sides so I planted the entire undisturbed pellet into the soil.  I watered with a new seedling organic fertilizer (PHC).  Hopefully, the roots will now have a place to go and the seedling will be well fed until they are ready for transplant in the garden mid-April.

Now again it will be wait and see.  Fortunately, if they all die from being pot up there is still time to start anew for the season.

Thursday, March 3, 2011

Alyssum sprouting

I planted a 72 flat of coleus and alyssum two days ago and the alyssum are starting to show their roots.  Nothing from the coleus but I'll try to be patient.


My brassica seedlings are still alive.  I watered them for the first time yesterday.  The Burpee seed starter pellets seem to hold onto water so I resisted watering.  I also misted them with the chamomile tea to prevent damping off.  I have no clue when to expect true leaves or if the seedlings look the way they should or not now.  Are they too leggy? Are the stems too thin? Hard to evaluate hardiness if you have no clue what that looks like.  Is this what parents go through in evaluating their children's developmental milestones? I thought I'd be a much more easy going grower than this...  shocking to find myself peering at them multiple times a day wondering if the seedlings are healthy.


 Perhaps my lack of confidence is visible to all since my offer to grow flowers for my girlfriends' roof deck was politely declined.  Apparently they don't like straggly geraniums and they prefer to pick them out.  In other words they don't trust me.  However, they would be grateful for morning glory vines and nasturtiums (I can't even spell that flower).  So essentially if a flower is a weed and requires no special care they think they'll get something from me come Memorial Day planting.  Maybe I'll surprise us all with a bounty of healthy gorgeous flowers.....


Wednesday, March 2, 2011

The Fenway Garden Society Board has been busy

I went to check something over at the Fenway Victory Garden website and discovered that changes abound.  The new 2011 dates are in as well as all updates on FVG policies, etc.  Also FVG is committing to its virtual footprint in highly useful ways.  I was excited to see that the new President Mike Mennonno had started a blog for the Fenway Victory Gardens that included information about the FVG, community gardening, Boston green space, and victory gardening in general.  The FVG Facebook group is active again.  They introduced us to a new garden social networking site Your Garden Show where FVG gardeners can share their gardens and easily keep track of plantings, post pics and videos, keep gardening journals, etc.  I've added my garden there as well to keep the other FVG gardener Kristen's glog company. And for all of you who want to see pics of gardens over at the FVG they have started a group photobook at Flickr so people can upload pics of their gardens.

I uploaded photos from the after party of the last FVG clean up to the Flickr site if you want to see some FVG gardeners looking dirty after a great morning getting the gardens ready for winter.  Speaking of winter my mom and I went to go look at the garden yesterday.  It is still buried under snow but I was relieved to see only minor damage so far from our tough blizzards this season.  My arbor lost it's roof but that will be an easy fix come spring.  We also got to see a pussy willow tree in full bloom against a blue sky.  It looked like snow crystals on branches.  Spectacular.  The red cardinals are also all about enjoying the bits and pieces poking through the snow.

More updates on the growing station....  Mom and Dad bought us an incredible new light so one more shelf for seedstarting.  In return I sowed 72 coleus and alyssum for their NH garden.  The seeds were so small that I had to pick them up with a moist needle and transfer them one by one to their new home.  I hope they germinate.  I am using my only non-organic seedstarting kit for the flowers.  It has a self-watering mat which I hope will keep them happy for a while since I don't have the best history with keeping things wet.

Saturday, February 26, 2011

OMG it worked!

Overly excited to report almost 100% germination after only a few days. I think having them near the hot water heater for the last 48 hrs really helped them take off.  I now have them under lights.  I have not needed to water them since I sowed.
I've been reading both in Dave's Garden and in the forums of Square Foot Gardening that misting the seedlings with a dilute chamomile tea helps prevent damping off.

Now I have to wait two weeks before I can start my next set of seeds.  I so want to sow more now!  I know why first time gardeners end up with more seedlings than they have garden for.... so much fun to see them "hatch."

Wednesday, February 23, 2011

The dangerous seed catalogue

Veggie porn
After I had closed down my garden for the winter and before I got distracted by wintry things I made the mistake of opening a seed catalogue.  Now I have minimal experience with gardening and no experience with seed starting.  I wasn't really thinking at the time about how I was going to start seeds.  I was thinking that the organic transplants last summer were so expensive and I could save money starting from seed.  A few bucks per seed packets seemed so much better than transplants especially because they would likely last me a few years.  It would be so much fun to follow the process from seed to produce.  Blah, blah, blah.  Truth be told I was seduced by Baker Creek Heirloom Seeds.  Who can resist all the veggie porn and gossip about the quick and easy producers in that catalogue?  So I ordered seeds-- a lot of seeds-- and stored them away for spring.


The FVG plot is locked under snow and ice and I wasn't thinking about my new hobby.  Then I started seeing posts online about people starting their seeds.  They must live in warmer climates.  What? They live in MA and they are starting seeds in Feb?  Really?  Well one quick call to my mother and I realized that I was LATE.  Not only was I getting a slow start, I had no idea what I was doing.  I had fantasies way back when I bought the seeds that I would have enough funds to buy a SunLight Garden Jump Start Kit.  I obviously was high on the new garden at the time.  So now back on earth how do I create an indoor growing system that will be affordable?  Do you need special light bulbs?  How far will the light cover extend?  Do you need a refractive fixture?  How many fixtures per flat?  How many hours a day?  How many inches from the seeds?  How do I germinate?  What the hell is that?  And where the hell am I going to put all this equipment?


After exhaustive internet searching, wringing of hands, excessive time spent in gardening stores and Home Depot my mother and I came up with a solution.  So far we have a 5 shelf (36" x 16" x 72") utility cart, multiple cheap closet fluorescent lights (the shop lights only came in 4 ft and the grow lamps were expensive), and full spectrum T8 fluorescent bulbs. I will buy a few of the Hydrofarm JSV2 2-Foot Jump Start T5 Grow Light System when I save up, but in the meantime my system is 1/5th the price. For the actual seedstarting I have a collection of Burpee's seedstarting kits whose trays are made from plant materials and organic dot pots and organic seedstarting mix. 


Finally, I was able to sort through all my seeds and put the varieties into my plan and schedule for the seedstarting indoors and out.  Here's my plan using the garden planner from GrowVeg.


A clip of the 8 page document that is my plant list for 2011


I started broccoli, cabbage, and cauliflower today.  I was supposed to start them Feb 12th but it wouldn't be me if I was on time.  I sowed expecting a 80% germination rate although the seed packet indicates a 95% rate.  Here's a picture of my Burpee 36 kit with the labels.

I'm germinating them close to my hot water heater hoping that will provide enough heat.

Now I just wait and water and wait and at the first sign of life get them under the lights.

Fall/Winter Summary

Ok so I am proving to myself that I am not a blogger as I never managed to get a second post in last year.  However now that I am getting ready for my first full season with my community garden I realize that it is so helpful to keep records and photos and so much better for it to be in one place.  Let's see what I can pull from memory of what we accomplished since late October....

Harvests
  Given that I didn't get plants in the ground until August I was pleased with my harvests.


I didn't have enough time for the tomatoes to redden or some of the produce to get to full size but I did get a lot of basil, fall lettuce, snap peas, tiny but delicious carrots and a ton of green peppers.

Globe artichokes grew wonderfully but never flowered


Amazingly, the plants were still flowering in November when I finally put the beds to bed...


Season Extending
  I used PVC hoops secured to my raised bed by the wooden dowels in the interlocking sides of the bed. Unfortunately many of the dowels broke off at the end of the season and many times I had to put the PVC into the soil to secure.  Next year I will tamp longer metal dowels into the existing holes so there is more for the PVC tubing to "hold on".  I bought garden quilt fabric so that I could protect from the early frost.  This turned out to be effective but messy.  The fabric came in 6 ft or 12 ft wide rectangular options.  The crossing hoop made with PVC over my 4x4 raised beds required the 12 ft in order to cover the sides.  Unfortunately it was too big and had to be cut down both length and widthwise.  Given my curious tendency to cut at an angle even when trying to cut straight I ended up with a very awkward system. Even folding and holding down with stakes it still was messy and blew off in the wind.  

I long for an easy pop up system like the one at Gardeners but they have it in 3 ft increments.  I need 4x4.  The rectangular fabric would have likely worked better if I had the PVCs as a hoop instead of the crossed bars but the conventional size I bought cheaply was too long for the hoop and I was too lazy to cut them down.  This year I will have vertical frames on each box so I will need to come up with a new solution.  Whatever it is I want it to have elasticized or velcro bottoms to fit snugly on the box so I don't need to bother with the staking.  And it has to be easy to fold up and store away for winter.

Preparing the beds for winter
  The community garden stops providing water after the first frost in October and it is "closed" during the winter months.  In early December I pulled out the remaining tomatoes, peppers, and the non-fruiting artichokes.  I stored away the PVCs, my two large garbage cans with compost and Mel's Mix, and my supplies against the fence under a cover.  I covered all of my beds with cocoa husk mulch to keep the weeds down, provide nutrients, and help with warming come springtime.  I'm so curious to see what it will look like when all the snow and ice melt.


Making an entrance
  I am a sucker for flowering vines and arbors.  I decided to mark the entrance to my plot with an arbor adjoining my gate.  
The naked gate


We are very limited with height restrictions at FVG and I am limited on budget.  I decided on a lattice approach so that the vines would have easy climbing and found cheap wood lattice at Home Depot that I framed in and covered with cedar planks on top. 


I enlisted my mother to help with this project.  She had the patience of a saint as I measured, remeasured, cut wrong, and remeasured again. It is still crooked but I am hoping that the vines will cover all sins.  My plan is to grow sweet autumn clematis up the left side which will bloom in August and John Clayton Coral honeysuckle up the right side which will bloom in June and train them both to grow over the other side.


Landscaping

 My parents have an adjoining lot to mine.  While my garden is all about the vegetables, their garden is so much more: seating, pond, and FLOWERS.  They had some existing structure so this season we have mostly cleaned up overgrown weeds, invasive vines and roses.  We moved existing azalea and hydrangea bushes.


We also started a patio and set up table and chairs.  We still have more bricks to lay and edging to do.  Depending on how wet the spring is we will need to relay and sand the patio.  Hoping it dries out early enough to get this tackled before planting weather.


We dug out the existing pond liner as it was leaking and cleaned up the growth around it.  Come spring we will add a fountain and vegetation.


We repurposed an existing shed and planted wild flowers on top.  I bought the wood to reinforce the roof of the shed and give more room for planting soil so that the wildflowers can do their thing come spring.


 First snow in December and I haven't been able to get into the garden since.  Looking forward to seeing how things thaw out.