Saturday, March 26, 2011

Sharing my germs with the seedlings: not quite the called for inoculant

Yesterday I was sick.  Like cough up a lung, whine to anyone who will listen, feverish sick.  I couldn't get dressed or think of leaving the house.  After a few hours (try 8) of feeling sorry for myself I realized that this was the day to get my veggies sowed.  After all they certainly wouldn't be bothered by my sneezing and coughing virus particles all over them.  Perhaps the virus inoculant would protect them against fungi in a competitive, territorial, "I was here first" kind of way.  Or not.

I pulled out the flats, heating mats, organic seedstarting soil, and the seeds.  I actually thought it would take me an hour or so.  Six hours later I finally finished the last flat.  Partly this is because I was sneezing and blowing and stopping to take Cold Eeze and tylenol.  Partly because I am so very distractible.

I first had to rearrange all my flower seedlings from the 19th.  After much careful planning to assure that each flat had seeds with similar germination times and environment needs, I discovered that planning for germination is an amusing reminder of nature over science.  About half of the seeds germinated in two different flats from different sides.  After flipping the trays around and using a cover over only half of each tray on the 22nd I finally had to come to terms with the fact that I was going to need to cut the flats. Of course no rhyme or reason... one six pack of the same seeds germinated and the other six pack with the same seeds attached to it did not.
So I spent some time cutting the six packs apart from the 72 tray and reorganizing in new containers so those that had not germinated could do so and those who had could get more light.

Then I remembered that I had not planted the pansies and violas that I had stratified on the 19th.  So before I got to the veggies I went ahead and used up one of my plastic flats/peat pellets for the cold seeds. Since I didn't have the heart to throw away the remaining stratified seeds I planted them in Miracle Gro seedstarting mix and peat pots in a reused salad container.  I'm not sure why I am adverse to tossing out the seeds.  You can see the poor collection of plastic containers that I pulled into use so that I wouldn't have to toss the flower seeds on my post on the 19th.

Finally I start preparing for the veggies.  I had 13 different types of peppers, 16 different types of tomatoes, and lots of lettuce varieties.  I managed to get all the peppers in one flat and the tomatoes in the other.  I will need one plant of each variety for my SFG.  I sowed two for each variety with some extras. If need be I can start another flat with more of each.  I used self-watering Burpee's Eco Kits with "plastic" made from corn and deep cells filled with organic peat for the peppers and tomatoes and placed both of them on heating mats.  The lettuce is planted 4/square in SFG and so I sowed 4 cells/variety (head and leaf, arugula, endive, cress, mache and chrysanthamum).  I sowed a few/cell in organic seedstarting mix and APS self-watering greenhouse kits. The seeds are so small that trying to do one per cell is too time intensive.  I'll just have to learn how to snip out the weaker seedlings.  However given my track record in being unable to throw out seeds, we'll see if I can successfully cull down to one seedling/cell.

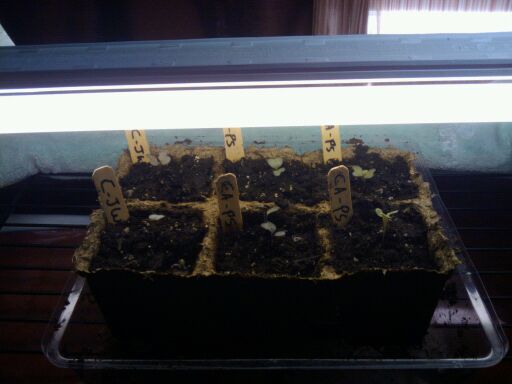
Top shelf in picture has left to right: flowers, tomatoes, peppers on heat mats Bottom shelf has two 32 cell flats with lettuce, mache, endive, chrysanthemum

Thursday, March 24, 2011

The winter thaw

I finally got a chance to get into the FVG to look at my plot.  Last time I was there it was so covered in snow that I didn't think it would thaw out until April.  A day of warmer temps helped uncover the beds... unfortunately just in time to expose them to freezing temps now that they weren't insulated under the snow.  Oh well.

Very few losses from the winter.  My arbor lost its roof...

 I knew that I hadn't secured it properly.  Fortunately the wood is still intact and I just need to reattach it with better screws.  The gate lost its top shelf which also was on the ground.  I'll need to do some aggressive gluing and bolting.

I was surprised to see that my strawberries had overwintered and were already coming up green.  I actually had thrown them into the bed replacing spent peppers as a last thought at the end of the season and got a few fall strawberries.  I never intended them to stay in the bed.  I had a strawberry planter that had succulents in it that I expected to die during the winter and planned to reuse the planter for the strawberries.  Neither the succulents nor the strawberries died.  I'm sure if I wanted then to survive they wouldn't have.  So I'll have to figure out where to put the strawberries since that square foot is already taken for peppers again.  I'll leave them until May since I can't plant the peppers till then anyway.

My beds have settled a bit and I can see that some underground munchkin has been at them.  I didn't have any problems with burrowers last year and didn't think to put down a mesh underneath my weed blocker.  I hope I won't have to dig up all my mel's mix and add chicken wire to the bottom of the boxes.
When it warms up and I go to add my compost to each square for the new season I'll investigate further.  It was too cold to do it on the first survey.


Here are the spring cleaning plans:
1) Build the cold frame
2) Repair the tomato trellis
3) Clear away space for another 2x6' raised bed for melons
4) Repair the roof of the arbor
5) Repair the gate
6) Replace the shed roof with a shallow box that can hold soil for wildflower mix
7) Change position of front layered boxes to allow for carrots/leeks
8) Add compost to each square of Mel's mix, water throughly, and cover with greenhouse plastic to warm the soil
9) Replace the area under the tarp in back with a potting shed
10) Add more mulch to the areas between boxes where the weed blocker is showing
11) Pull the wild onions that continue to grow through the weed blocker :(

Sunday, March 20, 2011

Grow Veg attacks

I have my garden plan at www.growveg.com.  I love the ease of design and all the info that comes with it.  One of the benefits is that you receive an email telling you when it is time to start sowing indoors or outdoors your planned seeds based on your area's frost data.  Well yesterday I received this email....


Plants you can sow under cover or indoors in the next two weeks:
Broccoli: Calabrese Green Sprouting Broc 
Broccoli: Romanesca Italia Broccoli 
Chives 
Cilantro: Slo-bolt Cilantro 
Cress: Wrinkled crinkled cress 
Mache: Mache Verte D'Etampes 
Peas: Golden Sweet 
Peas: Sugar Ann 
Pepper: Bulgarian Ratund 
Pepper: Chinese Five Color Pepper 
Pepper: Corbaci 
Pepper: Golden Cal Wonder 
Pepper: Jimmy Nardello Italian 
Pepper: Lipstick 
Pepper: Melrose 
Pepper: Ozark Giant 
Pepper: Patio Red Marconi 
Pepper: Pepper Purple Beauty 
Pepper: Pepper Red Belgian 
Pepper: Pepper Sweet Red Stuffing 
Pepper: Tequila Sunrise 
Tomato: Buckbee's New 50 Day 
Tomato: Chadwick Cherry 
Tomato: Delicious 
Tomato: EGG red tomato 
Tomato: Fox Cherry 
Tomato: Hazelfield Farm 
Tomato: Illini Star 
Tomato: Jujube Cherry 
Tomato: Lollipop Tomato 
Tomato: Morning Sun 
Tomato: Mule Team 
Tomato: Stupice 
Tomato: Thessaloniki 
Tomato: Tomato Cour di Bue 
Tomato: Tomato Egg Yolk 
Tomato: Tomato Orange Banana 

Plants you can sow outdoors or plant out over the next two weeks:
Arugula 
Broccoli: Calabrese Green Sprouting Broc 
Broccoli: Romanesca Italia Broccoli 
Cabbage (Spring): Early Jersey Wake* 
Carrot: Berlicum 2 
Carrot: Cosmic Purple 
Carrot: Jaune Obtuse Du Doubs 
Cauliflower: purple of siciliy cauliflower* 
Endive 
Endive: De Meaux 
Lettuce (Leaf): Dark Lollo Rossa 
Lettuce (Leaf): Devil's Ears 
Lettuce (Leaf): Little Gem 
Lettuce (Leaf): Merveille des Quatre Saisons 
Lettuce (Leaf): Sanquine Ameliore 
Mache: Mache Verte D'Etampes 
Peas: Golden Sweet 
Peas: Sugar Ann 
Spinach: Bloomsdale Long Standing 
Spinach: Merlo Nero 


Holy crap!  How in the world am I going to get all this done in two weeks?  I don't have enough lights or space or attention span.  After a few deep breaths I took stock and realized that I already started all the brassicas. The brassicas are ready for hardening off in the cold frame within the week. The lettuces, mache, endive, arugula, cress will all fit in two 72 in flats.  The carrots, spinach, and peas will be direct seeded in April.  I'll start the peppers this week and in two weeks start the tomatoes.  All but the peppers and tomatoes and basil will be outside or in the cold frame by April.  So indoors taking up all of my growing stand will be light and heat loving peppers and tomatoes.  


I think I can handle this...

Saturday, March 19, 2011

Boston Flower Show (without a camera) drives flower frenzy

I have a lot of flower seeds that I've been holding off on sowing because it will be a while before they can go outside and I'm not sure I will have the indoor space.  Well one trip to the Boston Flower Show and patience be damned.  I decided to sow most of my flowers after being hit by the spring bug of a beautiful day 3/17 and an amazing Flower Show.

I did not remember my camera so I have no pics to share but the Flower Show was divine.  I did bring home some daffodils, an orchid bloom, and a gardenia.


Then I set to work reviewing my flower seed list.  I knew I wanted to group them according to days to germination so I didn't have half a flat needing light and no lid and the other still needing the humidity dome and heat. I had two 72 cell flats which were not plant based plastic (which I use for my organic veggies) and limited space so all the flowers needed to fit in those two flats.  So I pulled out my seed packets and started to review the days to germination and was stumped by the next level of directions (scarification, soaking, stratification).  Excuse me?  So one step at a time, I organized by "days to germination" and then went to the internet.

Cosmos: Cosmic Orange (7-10d) and Bright Lights Mix (7-10d)
Amber Jewels (7-10d)
Minalobata: Spanish Flag (10-15d)
Nasturtiums:  Empress of India (10-14d), Gleam Mix (4-14d), and for eating Organic Fiesta MixViola:
Thunbergia: Spanish Eyes Mix (7-21d)
Cypress Vine: Red (7-21d)
Pansy: Swiss Giant Blend (10-20d)
Coreopsis: Mardi Gras (15-20d)
Morning Glory: Picotee Blue (10-15d), Heavenly Blue (7-21d), Flying Saucers  (7-21d)


I had to learn new skills in a hurry.  Some of the seeds required notching (scarification) and soaking overnight.  Some required stratification (period of moist cold followed by warmth).  The scarification I was able to do with a nail clipper being careful to avoid the ends of the seed.  The soaking overnight messed with my original plan to sow everything today.  So everything that could be direct seeded ended up in a Burpees self watering greenhouse flat with peat pellets.  The flowers requiring scarification and soaking overnight (nasturtiums, cypress vine, thunbergia, morning glories) were planted the next day in MG seedstarting mix and a flat with a humidity dome.  I notched and soaked all the seeds thinking some wouldn't swell and I could just sow the promising seeds.  I was surprised to see many seeds the next day with emerging roots (or seedlings? I have no idea which end is up).  I planted the seed "green thing emerging" side down.  I hope that was right. 
I had filled the flat with seedstarting mix the day prior and had water in the base tray.  Unfortunately, the mix was soaked by the next day.  I drained out the bottom tray and seeded anyway because I wasn't sure if I could leave the seeds soaking an additional day.  I'm elevating the humidity dome so the soil can dry out.  Perhaps the extra moisture will simulate nature with the snow melt we've had here with pure mud?  One can hope...

The pansy and viola seeds required stratification.  This means that either I sow the seeds in soil and then put them in the fridge for 5 days or place the seeds on a damp paper towel in a plastic baggy and after 5 days sow the seeds into seedstarting mix.  I'm not quite comfortable with the idea of soil in my fridge so baggy method it is.  I should be able to plant these on the 23rd.


Finally, there were seeds left over that had been soaked overnight but hadn't swelled. I didn't want to toss them so I planted them in seedstarting mix in a Burpee tray which is meant to be used with the coir pellets.  Unfortunately that means no drainage from below.  I also used a produce container with holes to seed the rest of the morning glories in seedstarting mix.  Both are covered with humidity domes with ventilation if the soil is looking too wet.  It's all an experiment.


That will be all for flowers.  I do have organic edible nasturtiums and crysanthemum which I will plant organically later and sunflowers and scarlet runner bean vine that I will likely direct sow.  I have limited lights and space so I have to be careful to not overreach with the seeds.  I did apply mylar (an emergency shock blanket from a first aid kit) and aluminum foil to try to maximize my light sources.  Not a pretty look for the bedroom...

Fortunately, at the flower show I did manage to buy the display cold frame with an automatic temperature set ventilation opener made out of eastern white cedar and double paned polycarbonate top and side for less than it would have cost me to make it.  I pick it up after the show is over and then will have to figure out whether the temps inside are high enough to think about hardening off my brassicas now.  I am excited about the cold frame because I had no idea where I was going to find space and lights for my lettuce, mache, endive, spinach, and snap peas which need to be started ASAP.  If the temps are high enough than I can germinate in the cold frames and use my lights for the warm loving peppers and tomatoes.

Thursday, March 17, 2011

Brassicas survived


Just an update to show the brassicas doing well in their new homes.  I have some on a self-watering mat and another in a regular tray.  I'm not sure if the cowpots are going to survive the self-watering mat as they might just decompose with such wet feet.  I do like that I can visually see the watering level with the cowpots.  Doing all my watering from below and have started using fertilizer in the water.  I am waiting to be able to start my peppers and lettuce.  Meanwhile will sow FLOWERS!

Monday, March 14, 2011

How deep do your roots grow?

Seeds planted 1/8in
I wish there was a timeline with pictures somewhere out in the virtual world where I could compare my growth with the "normal" development.  I planted the brassicas on Feb 23rd in a Burpee 25 cell netted pellet eco greenhouse (plastic is plant based and the netted pellets are coconut coir).  They almost fully sprouted by the 26th and were under lights since then.

Seedlings emerging
After about a week all the seedlings looked great with cotyledons and about an inch worth of vertical growth.  I had them <2 inches under lights 16 hrs a day.  I kept them on the dry side and watered them from below.  I also misted them with chamomile tea/water to help avoid damping off.
1 week old


Things seem to be going well.  I even see some buds to suggest that the true leaves are about to show themselves.  I had read that one shouldn't pot up into soil until the true leaves are out since the seedling feeds off of the cotyledon.  So I wait and wait and wait.  And about 2 weeks out the cotyledons look a little dusky.  I'm not patient so I lift up one of the pellets and I see that the roots are emerging from the sides and dangling long out the bottom.

2 weeks old 

See all the roots hanging down?
This seems to suggest to me that the roots are going deep looking for food.  The coconut coir has no sustenance per se so do I pot up now or do I use a water based fertilizer.  I sent out cries of help to SFG foundation forums and Dave's Garden forums.  It seems as others have had problems with the roots coming out of the bottoms.  I also was warned that I might "burn" the roots by feeding directly.

After much hemming and hawing I decided to pot up on March 11.  I used cowpots (biodegradable and made from cow manure) and an organic potting mix.  Clearly the pellet netting did not stop the roots from penetrating the sides so I planted the entire undisturbed pellet into the soil.  I watered with a new seedling organic fertilizer (PHC).  Hopefully, the roots will now have a place to go and the seedling will be well fed until they are ready for transplant in the garden mid-April.

Now again it will be wait and see.  Fortunately, if they all die from being pot up there is still time to start anew for the season.

Thursday, March 3, 2011

Alyssum sprouting

I planted a 72 flat of coleus and alyssum two days ago and the alyssum are starting to show their roots.  Nothing from the coleus but I'll try to be patient.


My brassica seedlings are still alive.  I watered them for the first time yesterday.  The Burpee seed starter pellets seem to hold onto water so I resisted watering.  I also misted them with the chamomile tea to prevent damping off.  I have no clue when to expect true leaves or if the seedlings look the way they should or not now.  Are they too leggy? Are the stems too thin? Hard to evaluate hardiness if you have no clue what that looks like.  Is this what parents go through in evaluating their children's developmental milestones? I thought I'd be a much more easy going grower than this...  shocking to find myself peering at them multiple times a day wondering if the seedlings are healthy.


 Perhaps my lack of confidence is visible to all since my offer to grow flowers for my girlfriends' roof deck was politely declined.  Apparently they don't like straggly geraniums and they prefer to pick them out.  In other words they don't trust me.  However, they would be grateful for morning glory vines and nasturtiums (I can't even spell that flower).  So essentially if a flower is a weed and requires no special care they think they'll get something from me come Memorial Day planting.  Maybe I'll surprise us all with a bounty of healthy gorgeous flowers.....


Wednesday, March 2, 2011

The Fenway Garden Society Board has been busy

I went to check something over at the Fenway Victory Garden website and discovered that changes abound.  The new 2011 dates are in as well as all updates on FVG policies, etc.  Also FVG is committing to its virtual footprint in highly useful ways.  I was excited to see that the new President Mike Mennonno had started a blog for the Fenway Victory Gardens that included information about the FVG, community gardening, Boston green space, and victory gardening in general.  The FVG Facebook group is active again.  They introduced us to a new garden social networking site Your Garden Show where FVG gardeners can share their gardens and easily keep track of plantings, post pics and videos, keep gardening journals, etc.  I've added my garden there as well to keep the other FVG gardener Kristen's glog company. And for all of you who want to see pics of gardens over at the FVG they have started a group photobook at Flickr so people can upload pics of their gardens.

I uploaded photos from the after party of the last FVG clean up to the Flickr site if you want to see some FVG gardeners looking dirty after a great morning getting the gardens ready for winter.  Speaking of winter my mom and I went to go look at the garden yesterday.  It is still buried under snow but I was relieved to see only minor damage so far from our tough blizzards this season.  My arbor lost it's roof but that will be an easy fix come spring.  We also got to see a pussy willow tree in full bloom against a blue sky.  It looked like snow crystals on branches.  Spectacular.  The red cardinals are also all about enjoying the bits and pieces poking through the snow.

More updates on the growing station....  Mom and Dad bought us an incredible new light so one more shelf for seedstarting.  In return I sowed 72 coleus and alyssum for their NH garden.  The seeds were so small that I had to pick them up with a moist needle and transfer them one by one to their new home.  I hope they germinate.  I am using my only non-organic seedstarting kit for the flowers.  It has a self-watering mat which I hope will keep them happy for a while since I don't have the best history with keeping things wet.